1、虚拟机中已经安装了Centos7.9的版本
2、安装gcc,以下是安装命令
yum -y install gcc如果出现以下错误
Loading mirror speeds from cached hostfile
Could not retrieve mirrorlist http://mirrorlist.centos.org/?release=7&arch=x86_64&repo=os&infra=stock error was
14: curl#6 - "Could not resolve host: mirrorlist.centos.org; 未知的错误"
进入/etc/yum.repos.d目录下找到 CentOS-Base.repo
进入目录:
cd /etc/yum.repos.d
cp  CentOS-Base.repo   CentOS-Base.repo.backup
vi CentOS-Base.repo
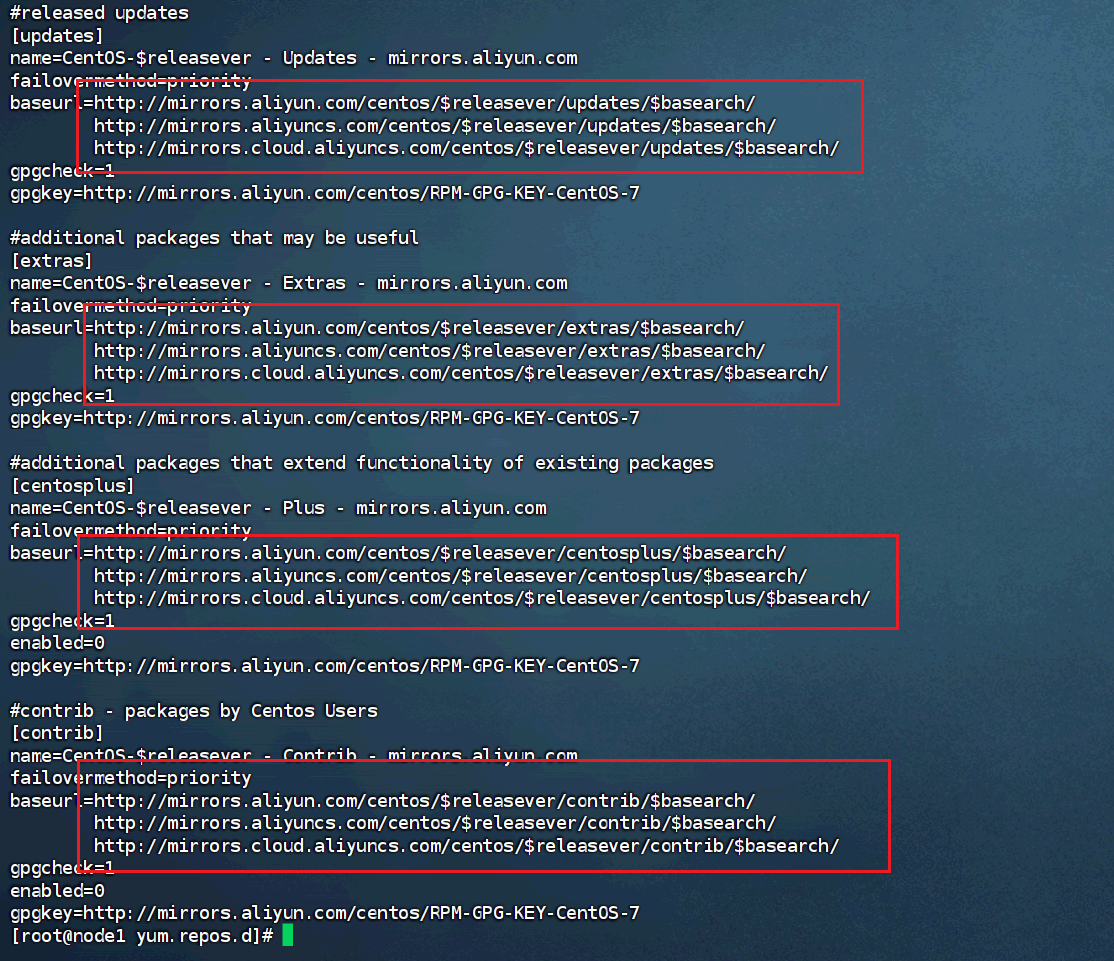
修改内容如下
# CentOS-Base.repo
#
# The mirror system uses the connecting IP address of the client and the
# update status of each mirror to pick mirrors that are updated to and
# geographically close to the client.  You should use this for CentOS updates
# unless you are manually picking other mirrors.
#
# If the mirrorlist= does not work for you, as a fall back you can try the
# remarked out baseurl= line instead.
#
#

[base]
name=CentOS-$releasever - Base
#mirrorlist=http://mirrorlist.centos.org/?release=$releasever&arch=$basearch&repo=os&infra=$infra
#baseurl=http://mirror.centos.org/centos/$releasever/os/$basearch/
#baseurl=http://vault.centos.org/7.9.2009/x86_64/os/
baseurl=http://vault.centos.org/7.9.2009/os/$basearch/
gpgcheck=1
gpgkey=file:///etc/pki/rpm-gpg/RPM-GPG-KEY-CentOS-7

#released updates
[updates]
name=CentOS-$releasever - Updates
#mirrorlist=http://mirrorlist.centos.org/?release=$releasever&arch=$basearch&repo=updates&infra=$infra
#baseurl=http://mirror.centos.org/centos/$releasever/updates/$basearch/
#baseurl=http://vault.centos.org/7.9.2009/x86_64/os/
baseurl=http://vault.centos.org/7.9.2009/updates/$basearch/
gpgcheck=1
gpgkey=file:///etc/pki/rpm-gpg/RPM-GPG-KEY-CentOS-7

#additional packages that may be useful
[extras]
name=CentOS-$releasever - Extras
#mirrorlist=http://mirrorlist.centos.org/?release=$releasever&arch=$basearch&repo=extras&infra=$infra
#$baseurl=http://mirror.centos.org/centos/$releasever/extras/$basearch/
#baseurl=http://vault.centos.org/7.9.2009/x86_64/os/
baseurl=http://vault.centos.org/7.9.2009/extras/$basearch/
gpgcheck=1
gpgkey=file:///etc/pki/rpm-gpg/RPM-GPG-KEY-CentOS-7

#additional packages that extend functionality of existing packages
[centosplus]
name=CentOS-$releasever - Plus
#mirrorlist=http://mirrorlist.centos.org/?release=$releasever&arch=$basearch&repo=centosplus&infra=$infra
#baseurl=http://mirror.centos.org/centos/$releasever/centosplus/$basearch/
#baseurl=http://vault.centos.org/7.9.2009/x86_64/os/
baseurl=http://vault.centos.org/7.9.2009/centosplus/$basearch/
gpgcheck=1
enabled=0
gpgkey=file:///etc/pki/rpm-gpg/RPM-GPG-KEY-CentOS-7
然后wq保存下,依次执行:
sudo yum clean all
sudo yum makecache
之后等待加载完成
进入到/etc/yum.repos.d
cd /etc/yum.repos.d
curl -o /etc/yum.repos.d/CentOS-Base.repo https://mirrors.aliyun.com/repo/Centos-7.repo
cat CentOS-Base.repo
看着镜像是阿里云的即可。 建议在执行下
sudo yum clean all
sudo yum makecache
至此该错误解决完成
重新执行安装gcc命令
yum -y install gcc
yum -y install gcc-c++
yum install -y yum-utils

//使用阿里云镜像仓库
yum-config-manager --add-repo http://mirrors.aliyun.com/docker-ce/linux/centos/docker-ce.repo
yum makecache fast
yum install docker-ce docker-ce-cli containerd.io
systemctl start docker
docker version
docker pull hello-word
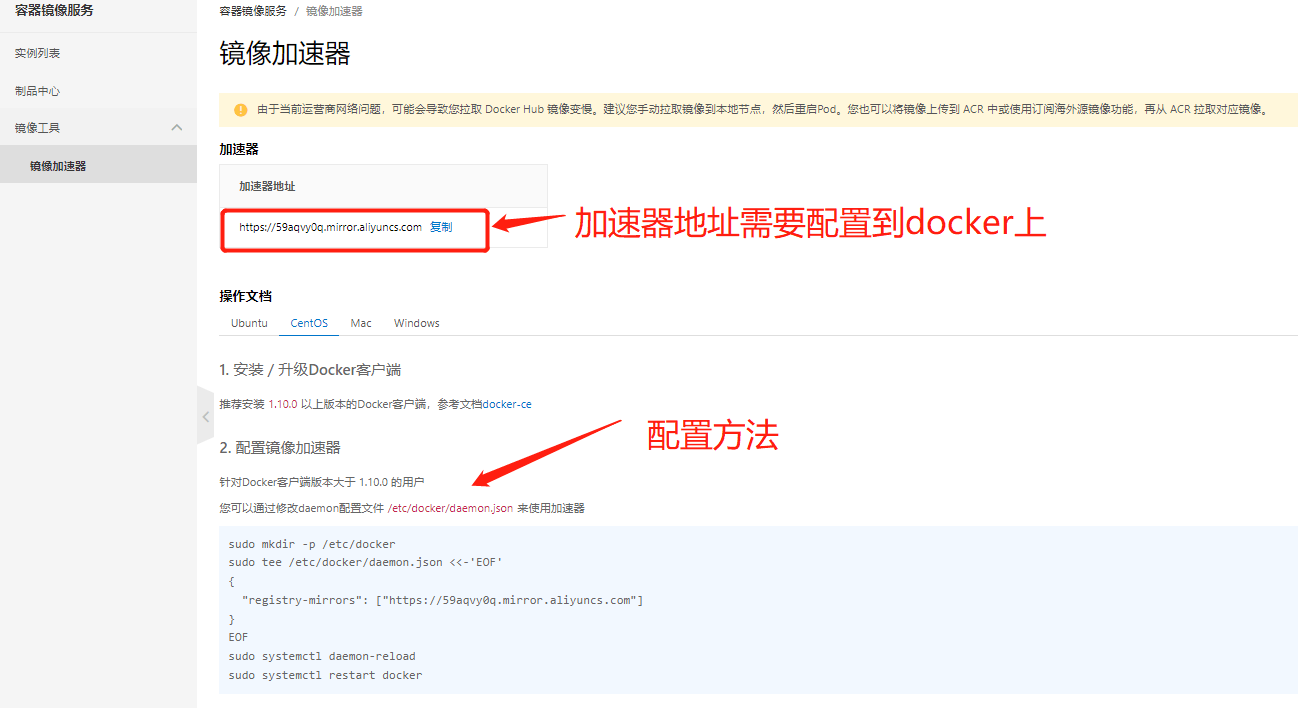
当运行 docker run hello-word时出现下载镜像超时问题,以下是解决方案
阿里云上创建一个镜像加速器


重新拉取hello-world镜像
docker pull hello-world如果还出现Error Get "https://registry-1.docker.io/v2/":环境报错问题
sudo vi /etc/docker/daemon.json添加已下内容
{
  "registry-mirrors":
    [
      "https://docker.m.daocloud.io/",
      "https://huecker.io/",
      "https://dockerhub.timeweb.cloud",
      "https://noohub.ru/",
      "https://dockerproxy.com",
      "https://docker.mirrors.ustc.edu.cn",
      "https://docker.nju.edu.cn",
      "https://xx4bwyg2.mirror.aliyuncs.com",
      "http://f1361db2.m.daocloud.io",
      "https://registry.docker-cn.com",
      "http://hub-mirror.c.163.com",
      "https://docker.mirrors.ustc.edu.cn"
    ]
}
修改完成后,重启 Docker 服务:
sudo systemctl restart docker这个镜像有些环境下可能在重新加载时,有报配置文件错误的情况,这种情况下,不要慌,检查格式,重新加入到环境中。
重新拉取hello-world镜像
docker pull hello-world就可以正常运行了
拉取osrm镜像,命令如下
docker pull osrm/osrm-backend如果发现拉取超时,则通过其它镜像进行拉取,命令如下(该方法是测试过可以正常拉取的命令)
docker pull ghcr.io/project-osrm/osrm-backend:v5.27.1注意:这里生成的镜像名称叫 ghcr.io/project-osrm/osrm-backend:v5.27.1
在执行命令时注意替换原先的 osrm/osrm-backend 名称
注意:这里的car.lua和china-latest.osm.pbf建议先下载,放到/data目录下
配置文件:car.lua
-- profiles/car.lua
speed_profile = {
  ["motorway"] = 110,
  ["trunk"] = 110,
  ["primary"] = 70,
  -- 确保所有道路类型有正数速度值
}

-- 允许车辆通行(避免 access 设为 "no")
access_values = { "yes", "permissive", "designated" }
地图文件下载地址: http://download.geofabrik.de
中国地图文件china-latest.osm.pbf 下载地址: https://download.geofabrik.de/asia/china-latest.osm.pbf
或者通过裁剪获取更精确的地址:
# 或通过裁剪获取更精确的区域(需安装osmium-tool)
sudo yum install -y osmium-tool
osmium extract -b 73.5,18.1,135.1,53.5 china-latest.osm.pbf -o customized-china.osm.pbf
最后按 https://hub.docker.com/r/osrm/osrm-backend 上面的安装步骤逐一安装即可完成
#切换到你的安装目录
cd /data

# 用不同交通方式提取数据,这里的car可以改成bicycle和foot,最后采用不同端口部署(5001:foot,5002:bicycle, 5003:car)
docker run -t -v $(pwd):/data osrm/osrm-backend:v5.27.1 osrm-extract -p /data/car.lua /data/china-latest.osm.pbf

# 进行数据分区:OSRM使用多级分区技术(MLD)将路网划分为多个层级的区域,以加速路径查询。这种分区结构使得在大型路网中进行路径计算时,可以快速缩小搜索范围,提高查询效率。
docker run -t -v $(pwd):/data osrm/osrm-backend:v5.27.1 osrm-partition /data/china-latest.osrm

# 数据订制化,定制化过程根据特定的交通方式和用户需求,对预处理的数据进行调整。例如,针对不同的交通方式,可能需要应用不同的速度限制、道路优先级或其他约束条件。定制化确保了路由引擎能够根据实际需求提供最优的路线规划
docker run -t -v $(pwd):/data osrm/osrm-backend:v5.27.1 osrm-customize /data/china-latest.osrm

# 以不同的端口运行
docker run -d -p 5000:5000 -v $(pwd):/data osrm/osrm-backend:v5.27.1 osrm-routed --algorithm mld /data/china-latest.osrm

# 检验
curl "http://localhost:5000/route/v1/driving/120.090546,30.430953;119.745823,30.223232" | jq

# 其他命令
docker ps -a 查看所有容器; docker stop 容器id 中断对应容器; docker rm 容器id 删除对应容器
如果拉取的是ghcr.io/project-osrm/osrm-backend:v5.27.1这个镜像,则按如下步骤安装
#切换到你的安装目录
cd /data

# 用不同交通方式提取数据,这里的car可以改成bicycle和foot,最后采用不同端口部署(5001:foot,5002:bicycle, 5003:car)
docker run -t -v $(pwd):/data ghcr.io/project-osrm/osrm-backend:v5.27.1 osrm-extract -p /opt/car.lua /data/china-latest.osm.pbf

# 进行数据分区:OSRM使用多级分区技术(MLD)将路网划分为多个层级的区域,以加速路径查询。这种分区结构使得在大型路网中进行路径计算时,可以快速缩小搜索范围,提高查询效率。
docker run -t -v $(pwd):/data ghcr.io/project-osrm/osrm-backend:v5.27.1 osrm-partition /data/china-latest.osrm

# 数据订制化,定制化过程根据特定的交通方式和用户需求,对预处理的数据进行调整。例如,针对不同的交通方式,可能需要应用不同的速度限制、道路优先级或其他约束条件。定制化确保了路由引擎能够根据实际需求提供最优的路线规划
docker run -t -v $(pwd):/data ghcr.io/project-osrm/osrm-backend:v5.27.1 osrm-customize /data/china-latest.osrm

# 以不同的端口运行
docker run -d -p 5000:5000 -v $(pwd):/data ghcr.io/project-osrm/osrm-backend:v5.27.1 osrm-routed --algorithm mld /data/china-latest.osrm
# 启动服务(debug)
docker run -d -p 5000:5000 -v $(pwd):/data ghcr.io/project-osrm/osrm-backend:v5.27.1 osrm-routed --algorithm=MLD --verbosity DEBUG /data/china-latest.osrm

# 检验
curl "http://localhost:5000/route/v1/driving/120.090546,30.430953;119.745823,30.223232" | jq

# 其他命令
docker ps -a 查看所有容器; docker stop 容器id 中断对应容器; docker rm 容器id 删除对应容器这里有几个天坑需要注意:
1. 首先需要通过cmd 进入到包含离线地图的文件夹,之后再运行上述代码。因为上面的代码用到的当前工作目录的完整路径环境变量--PWD。
2. 确保你的docker 配置高达12GB内存以上,如果你电脑全部内容只有12G,那就看其它解决方案。
3.上述代码其实是调用docker 创建了3个容器,每个容器在处理完毕后都是废物,可以进行删除。因为这三个容器的作用,就是调用OSRM相应的工具包来处理地图数据。
前面提到,如果内存小于12GB,怎么办?可以直接下载处理后的数据即可,里面包含了处理后的所有文件。所以如果直接下载处理后的数据,这三步可以省略。